环境搭建
实验系统环境:
系统:Fedora39
架构:X86_X64
用户:root用户环境
如果觉得文章可以的,请打赏作者喝一瓶矿泉水,感谢!!!
docker安装
注意:操作前请先关闭防火墙和SELINUX策略
操作如下:
1、关闭防火墙
systemctl stop firewalld.service2、关闭SELINUX
vim /etc/selinux/config修改内容如下:
# SELINUX=enforcing 主食掉原来的内容
SELINUX=disabled
然后重启Linux。
安装docker和docker-compose
sudo dnf install -y docker docker-compose查看docker状态
systemctl status docker如果处于运行之中,如下:Active: active (running) since Thu 2024-11-28 12:52:19 CST; 1 week 6 days ago
● docker.service - Docker Application Container Engine
     Loaded: loaded (/usr/lib/systemd/system/docker.service; disabled; preset: disabled)
    Drop-In: /usr/lib/systemd/system/service.d
             └─10-timeout-abort.conf
     Active: active (running) since Thu 2024-11-28 12:52:19 CST; 1 week 6 days ago
TriggeredBy: ● docker.socket
       Docs: https://docs.docker.com
   Main PID: 1211 (dockerd)
      Tasks: 251 (limit: 4584)
     Memory: 264.3M
        CPU: 5min 5.416s
     CGroup: /system.slice/docker.service
那么直接添加开机自启动即可
systemctl enable docker添加成功返回如下:
Created symlink /etc/systemd/system/multi-user.target.wants/docker.service → /usr/lib/systemd/system/docker.service.如果没有处于运行中,请使用如下命令启动
systemctl start docker1panel安装
执行以下命令进行安装
curl -sSL https://resource.fit2cloud.com/1panel/package/quick_start.sh -o quick_start.sh && sh quick_start.sh安装成功后,控制台会打印面板访问信息,可通过浏览器访问 1Panel:
http://目标服务器 IP 地址:目标端口/安全入口如果使用的是云服务器,请至安全组开放目标端口。
ssh 登录 1Panel 服务器后,执行 1pctl user-info 命令可获取安全入口(entrance)
安装成功后,可使用 1pctl 命令行工具来维护 1Panel
mongodb安装与搭建
拉取mongodb数据库镜像
root@fedora:~/emails# docker pull mongo:latest可能会出现下载超时的错误:
Get "https://registry-1.docker.io/v2/": dial tcp 192.133.77.59:443: i/o timeout使用国际网络解决该问题,或者切换docker镜像源地址或者docker代理。
使用curl测试网络:
curl -v https://registry-1.docker.io/v2/
* processing: https://registry-1.docker.io/v2/
*   Trying 75.126.115.192:443...
*   Trying [2a03:2880:f10d:183:face:b00c:0:25de]:443...
* Immediate connect fail for 2a03:2880:f10d:183:face:b00c:0:25de: 网络不可达
* connect to 75.126.115.192 port 443 failed: 拒绝连接
* Failed to connect to registry-1.docker.io port 443 after 21050 ms: Couldn't connect to server
* Closing connection
curl: (7) Failed to connect to registry-1.docker.io port 443 after 21050 ms: Couldn't connect to server
安装成功如下:
Digest: sha256:4f93a84f7d4d8b1b6cb7e0c172d8a44b0bed9b399f207165ea19473bdb5a36b0
Status: Image is up to date for mongo:latest
docker.io/library/mongo:latest
运行容器
docker run -d --name my-mongo -p 27017:27017 -v mongo:latest1panel安装mongodb
如果你有运维管理面板,那么搭建就是很容易的,例如宝塔、1panel。
我这里使用1panel面板来进行安装:
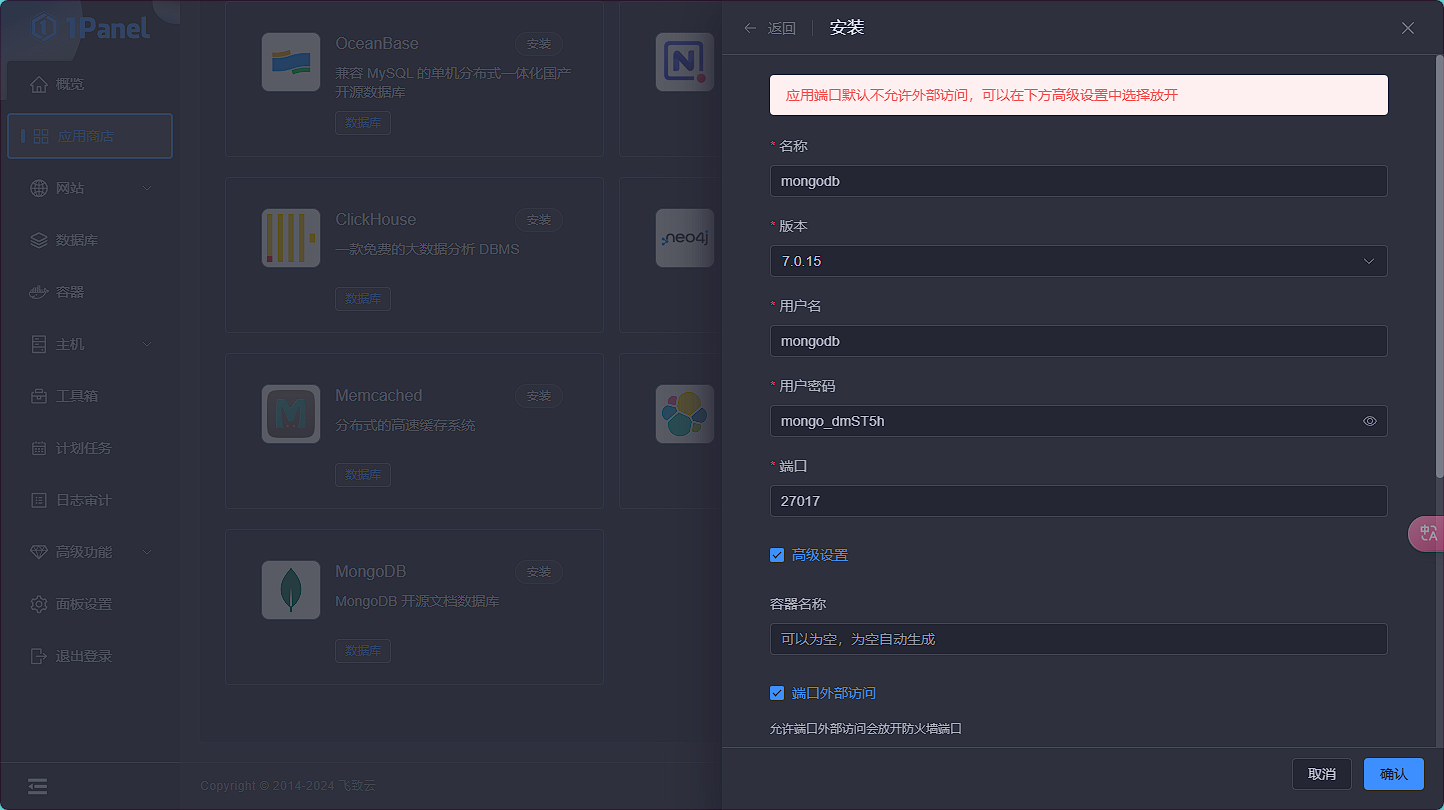
安装成功如下:

然后进入容器中进行配置,查看容器名称:
docker ps -a返回如下:

使用ID的方式进入

或者使用1panel运维面板进入

在MongoDB的test 数据库,我们这里默认进入了test数据库中,现在要创建一个 users 集合并插入文档数据:
db.createCollection('users')中途可能会出现如下问题,这是权限的问题
MongoServerError[Unauthorized]: Command create requires authentication推荐使用mongo-express,这是一个基于 Web 的 MongoDB 管理界面,进行一个方便的安装操作:
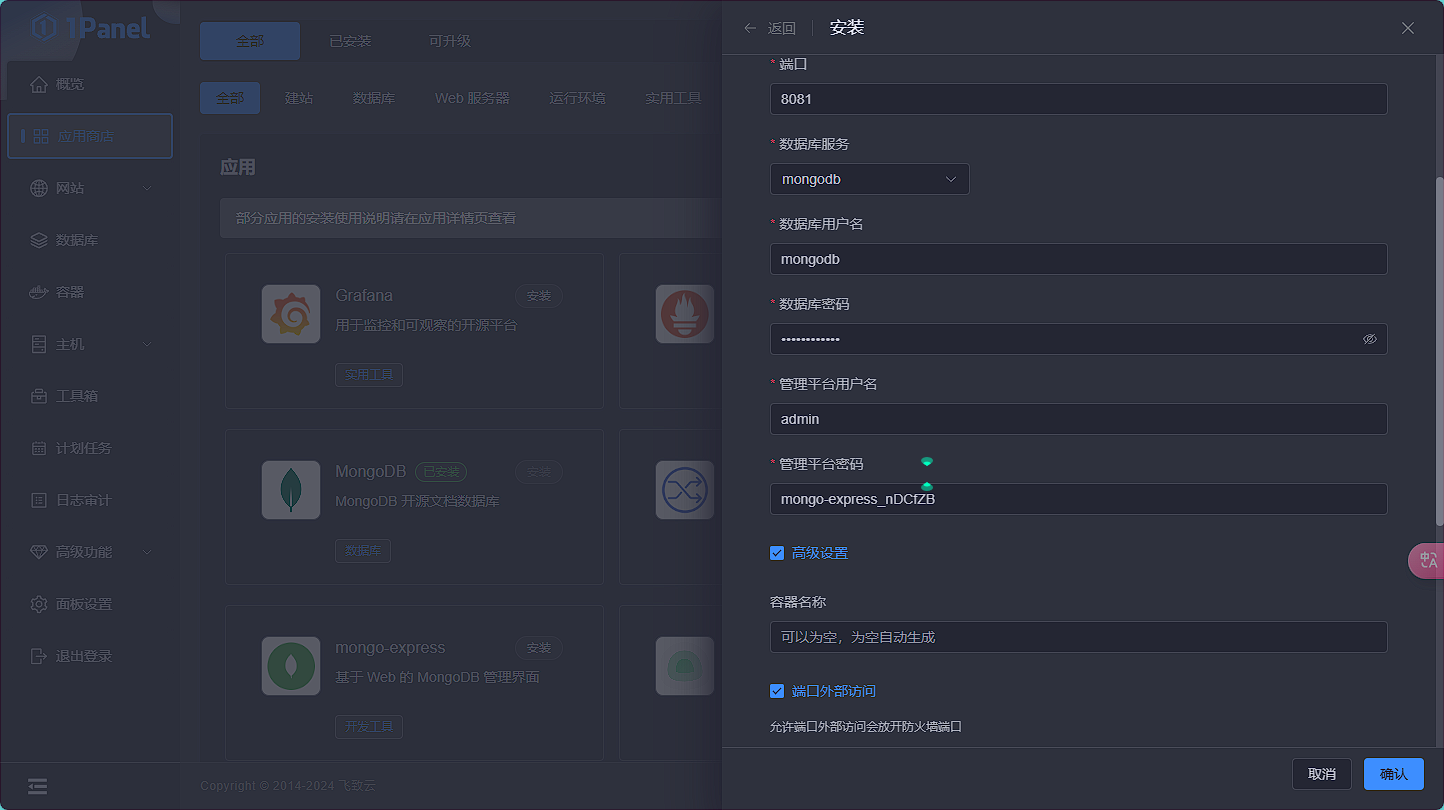
创建test数据库
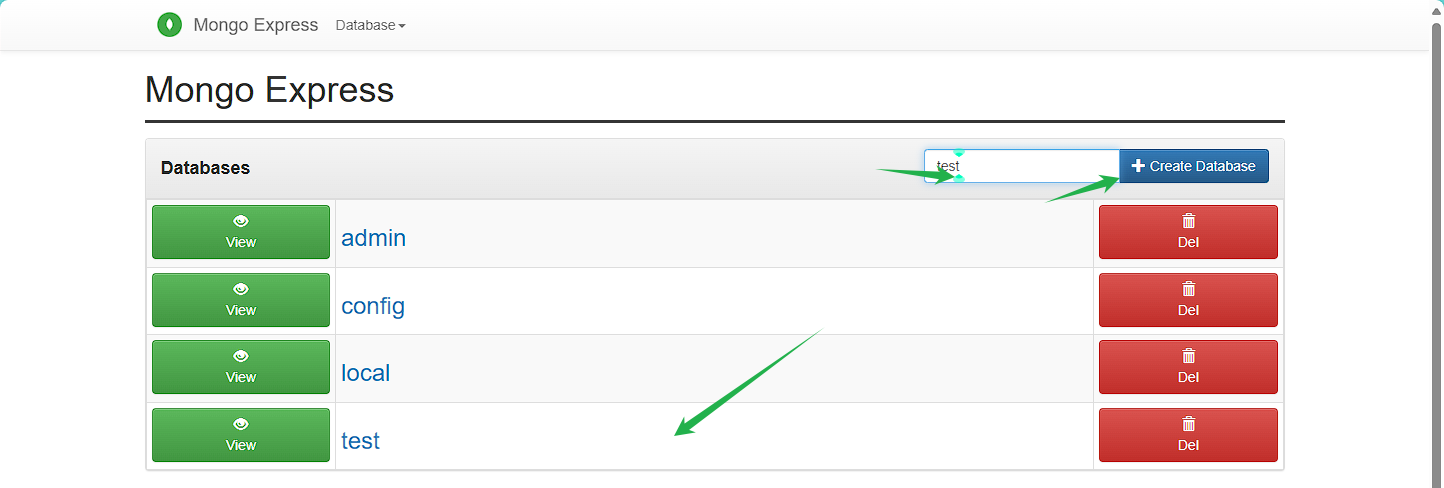
再次创建集合users
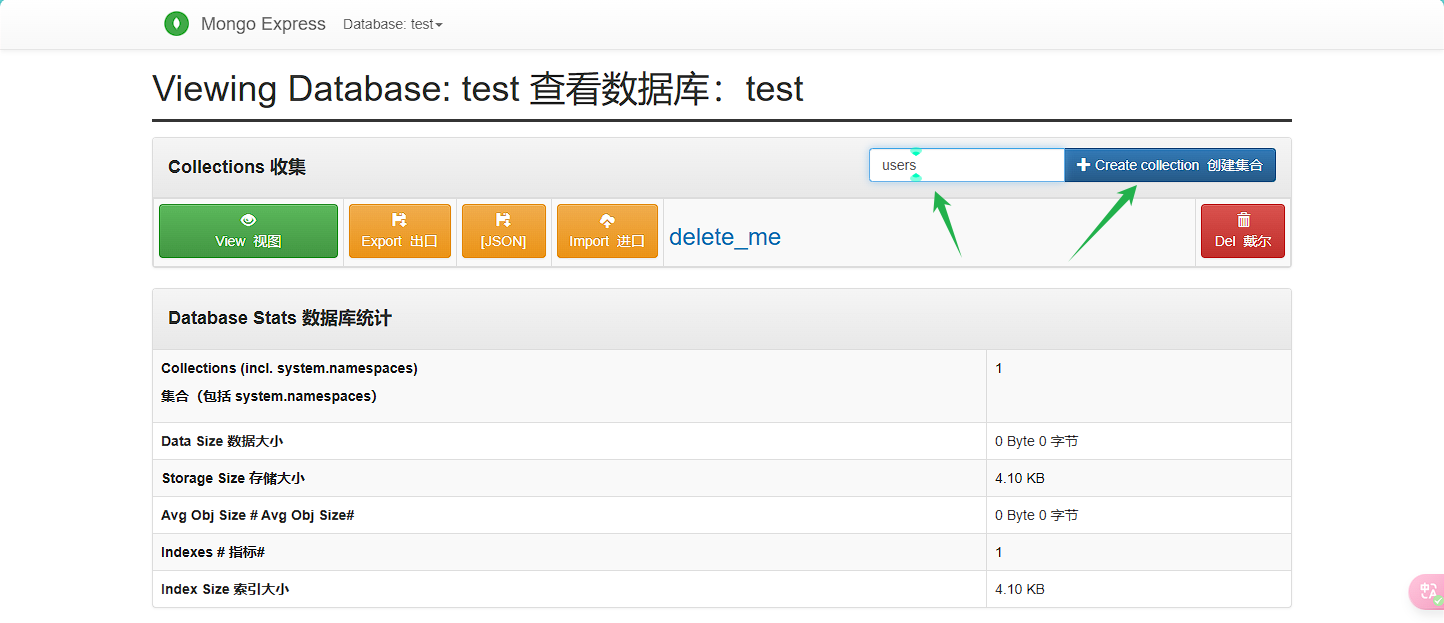
创建成功如图:
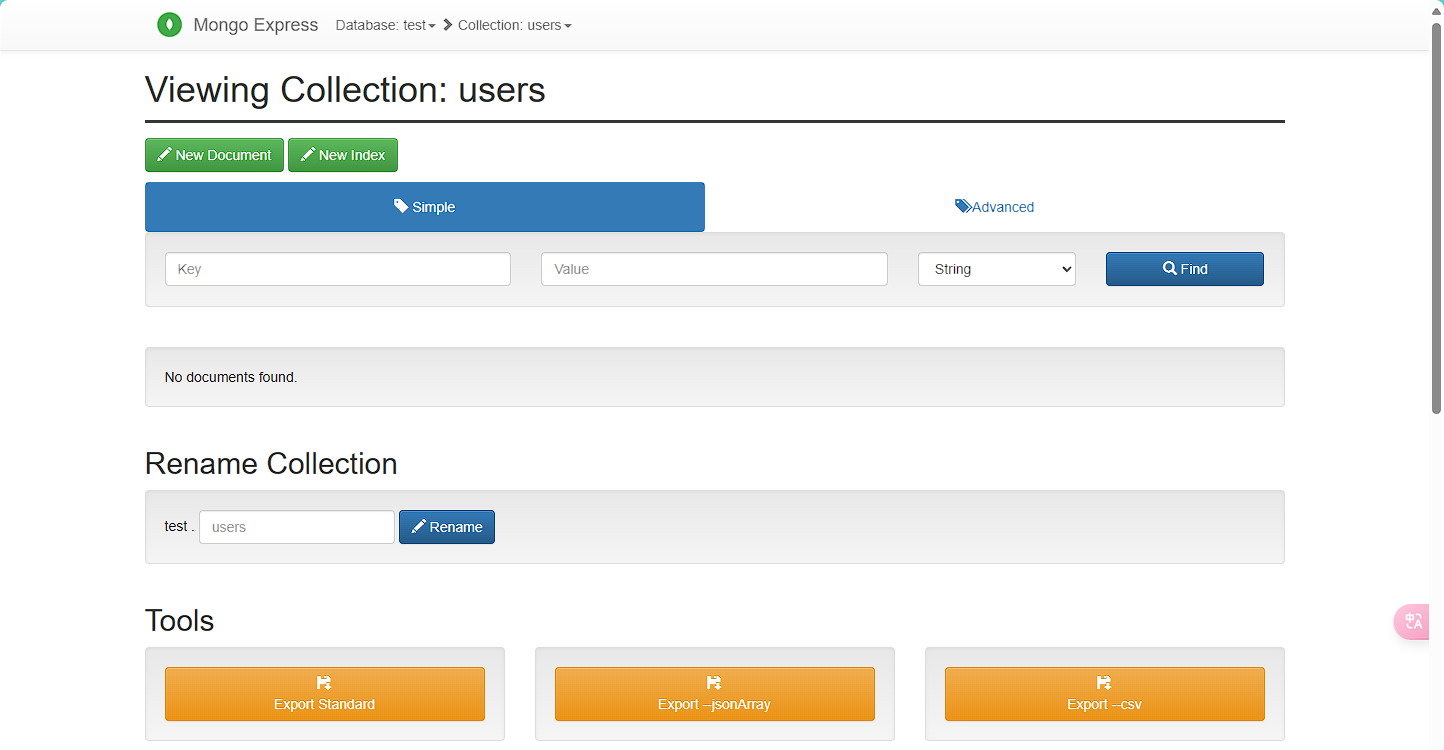
创建文档
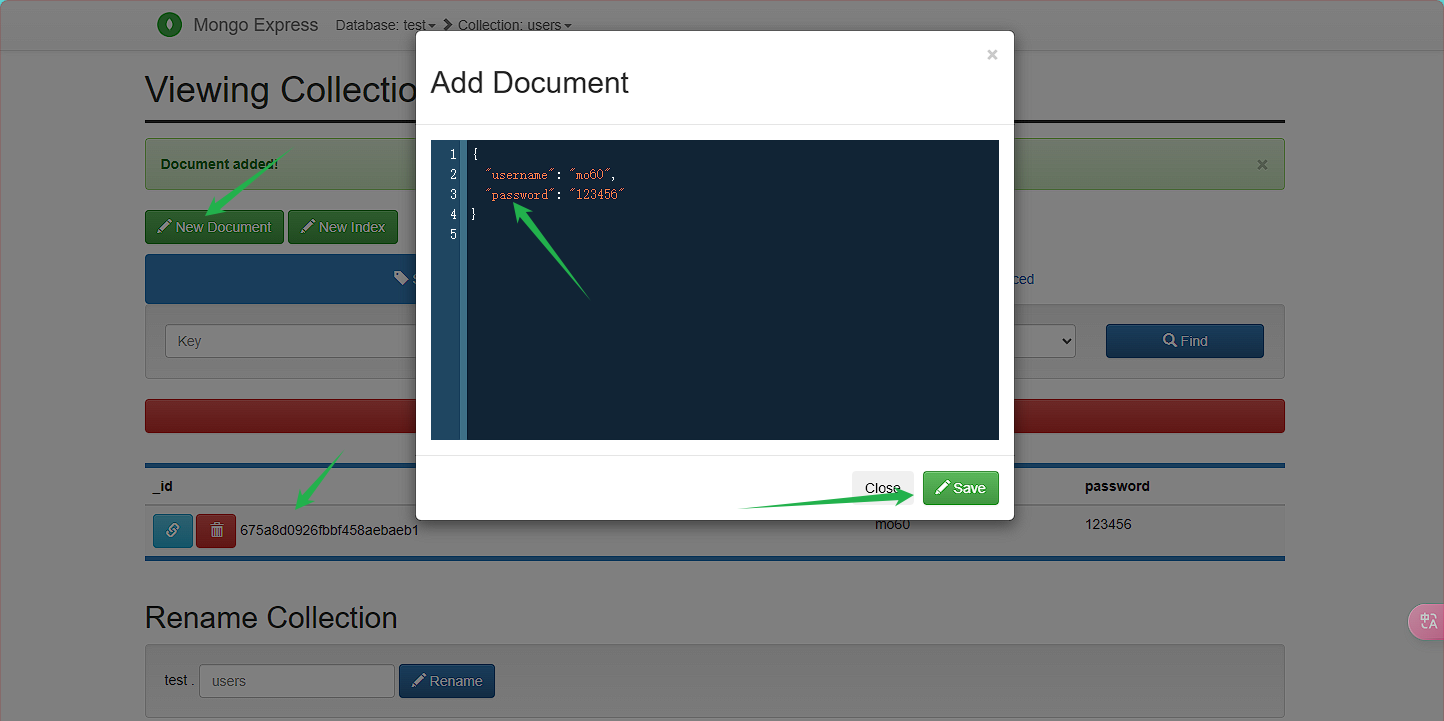
添加如下内容,依次添加
{username: 'mo60', password: '123456'}
{username: 'Juneha', password: '624522'}
{username: 'Jack', password: '468052'}
{username: '06om', password: '965379'}
添加完成如下:

PHP环境搭建
拉取PHP镜像
docker pull bigtruedata/php-mongodbpull成功如下:
Digest: sha256:00126ccae2bf8748b9f66e5b2a164a1d1a610ad345f7079559aa6967fcb8c945
Status: Downloaded newer image for bigtruedata/php-mongodb:latest
docker.io/bigtruedata/php-mongodb:latest
运行容器
docker run -itd --name php-mongodb -v ./php-www:/var/www/html -p 80:80 bigtruedata/php-mongodb 成功如下:

中途可能遇到的错误
容器地址网段不一样导致无法访问,如果你使用1panel搭建环境,推荐直接用1panel搭建php-mongodb环境,使用命令搭建就都使用命令,这样可以保证IP地址段在一个地方。
解决办法:
查看php-mongodb容器名称
docker ps -a 删除容器
docker stop c0525275c2b8 && docker rm c0525275c2b8然后在1panel中去创建
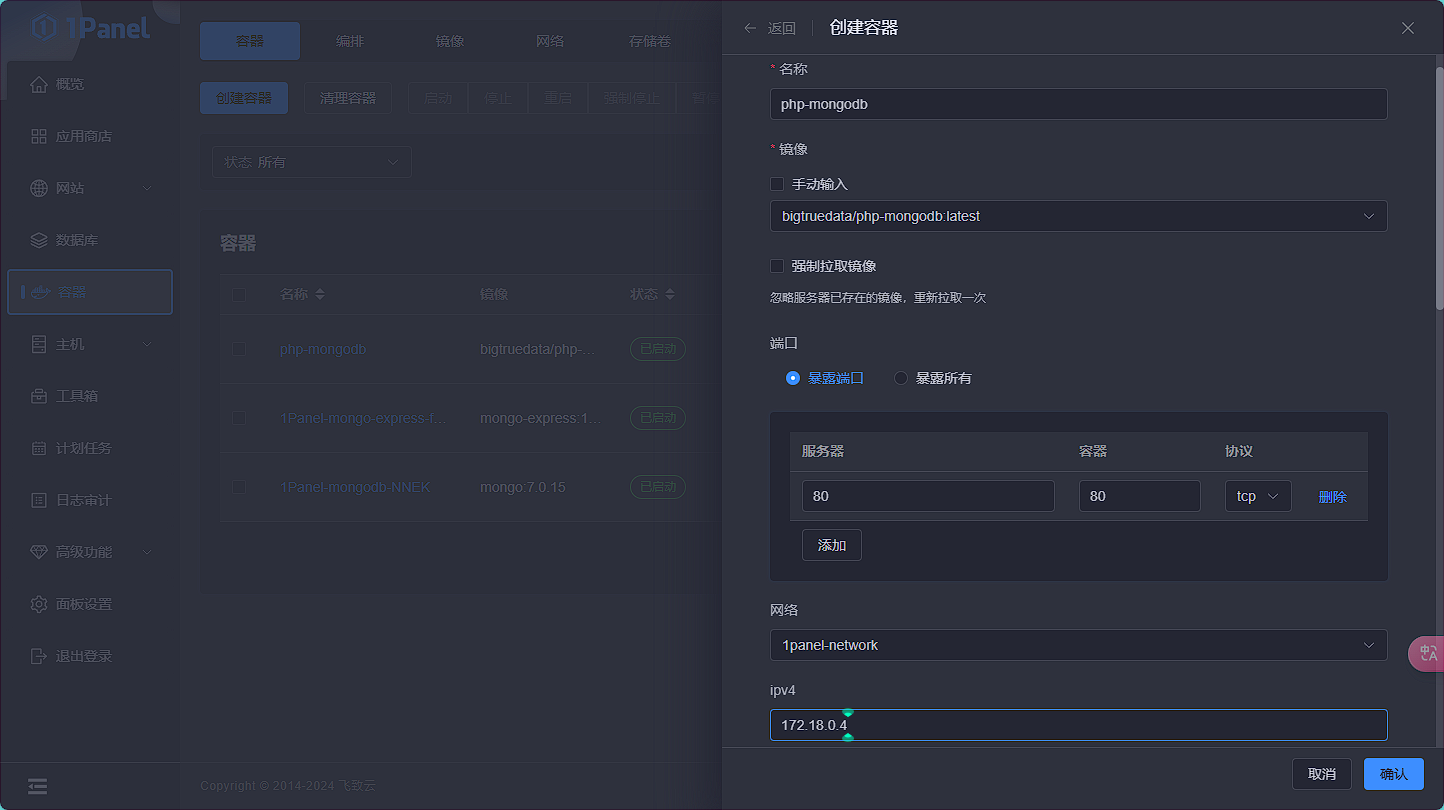
挂载到系统的路径位置随意,自己知道就好,容器地址是/var/www/html
搭建靶场
创建setup.sh文件
vim setup.sh文件内容如下:
#!/bin/bash

read -p "请输入 MongoDB IP 地址: " mongodb_ip
if [[ ! $mongodb_ip =~ ^[0-9]+\.[0-9]+\.[0-9]+\.[0-9]+$ ]]; then
    echo "无效的 IP 地址!请重新运行脚本,并输入有效的 IP 地址。"
    exit 1
fi
f1og="not is flag..."
fl0g="flag{MjAyNHdlbGMwbQ==}"
robots_content="User-agent: *\nDisallow: nosql.php\nDisallow: f1og.txt\nDisallow: fl0g.txt"
log_content="<?php \$o = intval(\$_GET['o']);   \$hint = \$_POST['hint']; ?>"
php_content="<!DOCTYPE html>
<html>
<head>
  <title>登录</title>
  <style>
    body {
      font-family: Arial, sans-serif;
      background-color: #f2f2f2;
      margin: 0;
      padding: 0;
    }
    .container {
      display: flex;
      justify-content: center;
      align-items: center;
      height: 100vh;
    }
    .card {
      width: 450px;
      padding: 20px;
      border-radius: 5px;
      box-shadow: 0 2px 5px rgba(0, 0, 0, 0.1);
      background-color: #fff;
    }
    .card h2 {
      text-align: center;
      color: #333;
      margin-bottom: 20px;
    }
    .card table {
      width: 100%;
      border-collapse: collapse;
      margin-bottom: 20px;
    }
    .card table td {
      padding: 10px;
      border: 1px solid #ccc;
      font-size: 14px;
    }
    .card form input[type=\"text\"],
    .card form input[type=\"password\"] {
      width: 97%;
      padding: 10px;
      margin-bottom: 10px;
      border: 1px solid #ccc;
      border-radius: 3px;
      font-size: 14px;
    }
    .card form button {
      width: 100%;
      padding: 10px;
      border: none;
      background-color: #4CAF50;
      color: #fff;
      font-size: 14px;
      cursor: pointer;
    }
    .card form button:hover {
      background-color: #45a049;
    }
  </style>
    <!-- https://blog.mo60.cn/index.php/archives/2023-China-Skills-Security-web1.html -->
</head>
<body>
  <div class=\"container\">
    <div class=\"card\">
<?php
if (isset(\$_REQUEST['username']) && isset(\$_REQUEST['password'])) {
    \$manager = new MongoDB\Driver\Manager(\"mongodb://$mongodb_ip:27017\");
    \$username = \$_REQUEST['username'];
    \$password = \$_REQUEST['password'];

    \$query = new MongoDB\Driver\Query(array(
        'username' => \$username,
        'password' => \$password
    ));

    \$result = \$manager->executeQuery('test.users', \$query)->toArray();
    \$count = count(\$result);

    if (\$count > 0) {
        echo '<h2>用户信息</h2>';
        echo '<table>';

        foreach (\$result as \$user) {
            \$user = ((array)\$user);
            echo '<tr><td>用户名:</td><td>' . \$user['username'] . '</td></tr>';
            echo '<tr><td>密码:</td><td>' . \$user['password'] . '</td></tr>';
        }

        echo '</table>';
        \$o = intval(\$_GET['o']);
        \$hint = substr(\$_POST['hint'], 0, 4);
        \$file = 'nosql.log';

        if (!empty(\$o) && !empty(\$hint)) {
            \$contents = file_get_contents(\$file);
            \$part1 = substr(\$contents, 0, \$o);
            \$part2 = substr(\$contents, \$o + strlen(\$hint));
            \$newContents = \$part1 . \$hint . \$part2;
            file_put_contents(\$file, \$newContents);
        }

        if (file_exists(\$file)) {
            echo file_get_contents(\$file);
            include \$file;
        }
    } else {
        echo 'Login Failed';
    }
} else {
    echo '<h2>登录</h2>';
    echo '<form action=\"\" method=\"get\">';
    echo '<input type=\"text\" name=\"username\" placeholder=\"用户名\" required><br>';
    echo '<input type=\"password\" name=\"password\" placeholder=\"密码\" required><br>';
    echo '<button type=\"submit\">登录</button>';
    echo '</form>';
}
?>

    </div>
  </div>
</body>
</html>"
html_content="<!DOCTYPE html>
<html>
<head>
  <meta charset=\"UTF-8\">
  <title>人力资源管理系统</title>
  <style>
    body {
      font-family: Arial, sans-serif;
      margin: 0;
      padding: 20px;
      background-color: #f2f2f2;
    }

    h1 {
      text-align: center;
    }

    .container {
      max-width: 600px;
      margin: 0 auto;
      background-color: #fff;
      padding: 20px;
      border-radius: 5px;
      box-shadow: 0 2px 5px rgba(0, 0, 0, 0.1);
    }

    p {
      line-height: 1.5;
    }
  </style>
</head>
<body>
  <div class=\"container\">
    <h1>欢迎来到人力资源管理系统!</h1>
  </div>
</body>
</html>"
echo "https://blog.mo60.cn/index.php/archives/2023-China-Skills-Security-web1.html"
echo -e "$robots_content" > robots.txt

if [ -e robots.txt ]; then
    echo "robots.txt 写入成功!"
else
    echo "robots.txt 写入失败!"
fi

echo -e "$f1og" >f1og.txt
if [ -e f1og.txt ]; then
	echo "f1og.txt 写入成功"
else
	echo "f1og.txt 写入失败"
fi

echo -e "$fl0g" >fl0g.txt
if [ -e fl0g.txt ]; then
	echo "fl0g.txt 写入成功"
else
	echo "fl0g.txt 写入失败"
fi

echo "$log_content" > nosql.log

if [ -e nosql.log ]; then
    echo "nosql.log 写入成功!"
    chmod 777 nosql.log
else
    echo "nosql.log 写入失败!"
fi

echo -e "$html_content" > index.html

if [ -e index.html ]; then
    echo "index.html 写入成功!"
else
    echo "index.html 写入失败!"
fi

echo "$php_content" > nosql.php

if [ -e nosql.php ]; then
    echo "nosql.php 写入成功!"
else
    echo "nosql.php 写入失败!"
fi
将文件复制到php-www目录
docker cp ./setup.sh c9502f60f1d4:/var/www/html成功如下:
Successfully copied 6.66kB to c9502f60f1d4:/var/www/html然后进入当前目录下的php-www目录,创建.sh文件内容如下运行即可生成所需文件
docker exec -it php-mongodb /bin/bash赋予文件执行权限
chmod +x setup.sh执行文件
./setup.sh
注意:如何查看 MongoDB IP 地址?
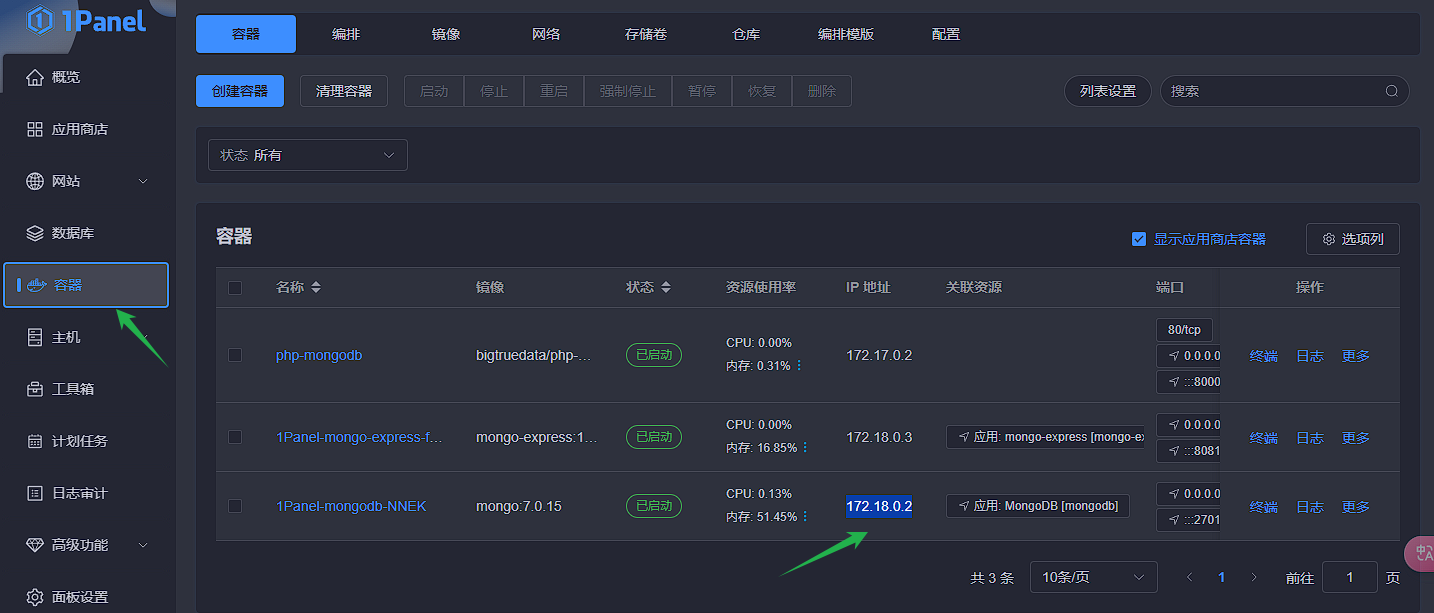
我们需要去1panel去修改文件:
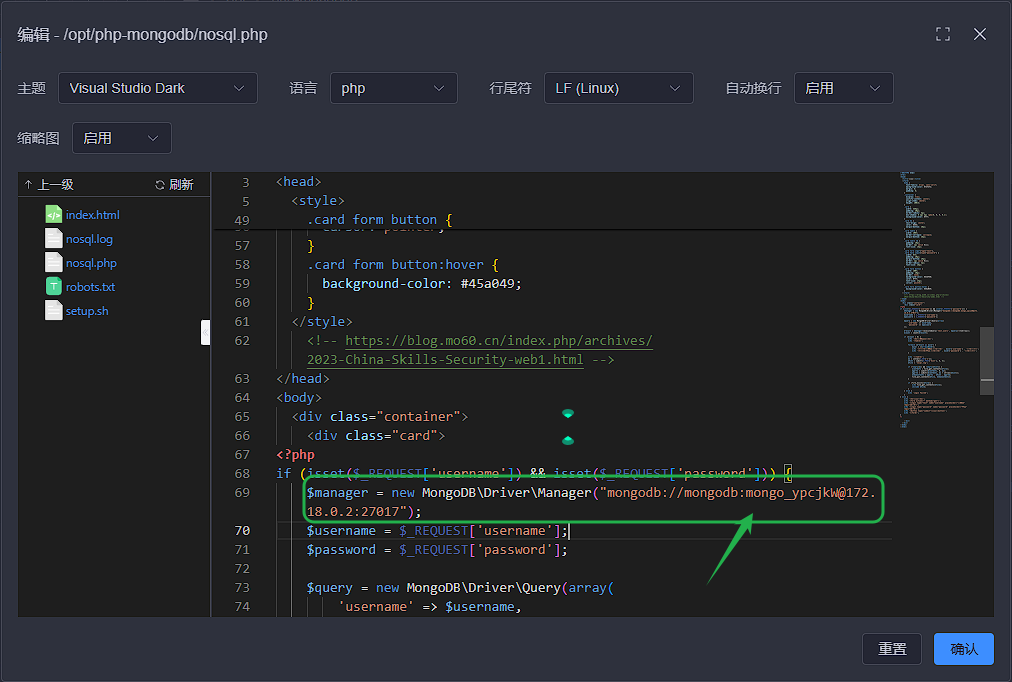
地址如下:mongodb://mongodb:mongo_ypcjkW@172.18.0.2
填写内容为mongdb用户:密码@容器
修改之手传到docker容器中:
docker cp /opt/php-mongodb/nosql.php b73f9e4a8930:/var/www/html成功返回如下:
Successfully copied 5.12kB to b73f9e4a8930:/var/www/html访问网站:


评论区